
-
#
-
# This is an example for a configuration file that can
-
# be passed to colinux-daemon in this manner:
-
#
-
# colinux-daemon @example.conf
-
#
-
# Note that you can still prepend or append configuration and
-
# boot parameters before and after '@', or you can use more
-
# that one '@ to load several settings one after another.
-
#
-
# colinux-daemon @example.conf @overrider.conf mem=32
-
#
-
# Full list of config params is listed in colinux-daemon.txt.
-
-
# The default kernel
-
kernel=vmlinux
-
-
# File contains the root file system.
-
# Download and extract preconfigured file from SF "Images for 2.6".
-
cobd0="c:\coLinux\root_fs"
-
-
# Swap device, should be an empty file with 128..512MB.
-
#cobd1="c:\coLinux\swap_device"
-
-
# Tell kernel the name of root device (mostly /dev/cobd0,
-
# /dev/cobd/0 on Gentoo)
-
# This parameter will be forward to Linux kernel.
-
root=/dev/cobd0
-
-
# Additional kernel parameters (ro = rootfs mount read only)
-
ro
-
-
# Initrd installs modules into the root file system.
-
# Need only on first boot.
-
initrd=initrd.gz
-
-
# Maximal memory for linux guest
-
#mem=64
-
-
# Slirp for internet connection (outgoing)
-
# Inside running coLinux configure eth0 with this static settings:
-
# ipaddress 10.0.2.15 broadcast 10.0.2.255 netmask 255.255.255.0
-
# gateway 10.0.2.2 nameserver 10.0.2.3
-
#eth0=slirp
-
-
# Tuntap as private network between guest and host on second linux device
-
#eth1=tuntap
-
-
# Setup for serial device
-
#ttys0=COM1,"BAUD=115200 PARITY=n DATA=8 STOP=1 dtr=on rts=on"
-
-
# Run an application on colinux start (Sample Xming, a Xserver)
-
#exec0=C:\Programs\Xming\Xming.exe,":0 -clipboard -multiwindow -ac"
-
-
coLinux 详解———基础篇 - Show Cat's Eye
coLinux 详解———基础篇
colinux是什么,这里就不介绍了,直接进入主题。
基础篇:从安装到配置。
google “colinux”得到的很多文章都是转的IBM developerWorks上的 www.ibm.com/developerworks/cn/linux/l-virtualization-colinux/
这文章写的很好,但当时的0.6.x版本的配置文件与现在0.7.x的有很大不同。
文件准备
colinux安装程序:下载(sourceforge
)
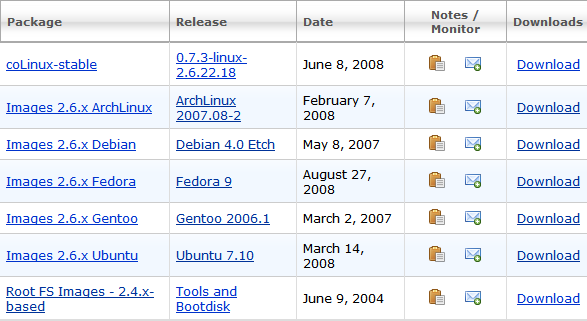
图中 "coLinux-stable"为安装程序。
根文件系统(RootFS):图中Images 2.6.x...任选,其中Arch为256MB的文件系统,Debian为1GB,ubuntu为2GB。资源紧张的可以选用Arch,推荐用Debian。
Swap交换文件:64MB 128MB 256MB 任选,如不进X,也可不用Swap。
Tips:
根文件系统:Linux中的"\"
Swap:类似于虚拟内存的东西
- 安装
一路回车法即可。将RootFS和Swap解压到任意文件夹。
- 配置
colinux-daemon.exe为colinux的主进程,所有的设定有两种形式。一是指定配置文件,一是将设置作为参数。对应字段是相同的,可以参照填写。
以配置文件为例:
自带的example.conf如下:
"#"为注释
16行:内核文件,默认即可
20行:根文件系统路径
23行:Swap文件路径(记得去掉"#")
28行:指定root所在设备,为根文件系统的设备号(一般是codb0)
31行:根文件系统设为只读,可以注释掉
38行:分配内存大小设置。就个人经验而言,colinux耗不了多少内存
40~47行:网络设置。其中tuntap的方式比较简便:安装coLinux时会增加一个虚拟网卡(例如:本地连接2),将其改为英文(如“coLinux”);将47行的"#"去掉,加入网卡名称。这一行例如:eth1=tuntap,"coLinux"。此时linux可以工作在DHCP下,不用更改网卡设置;但需要开启真实网卡的“因特网连接共享”(ICS),设为coLinux。
Tips:打开ICS时有时候会失败,最好断开网线,将coLinux打开。
当编辑好配置文件,就可以开始运行了。
colinux-daemon.exe @example.conf
直接加参数运行的方法如下:
colinux-daemon mem=64 kernel=vmlinux initrd=initrd.gz hda1=.\Arch\ArchLinux-2007.08-2-ext3-256m.fs hda2=.\Arch\swap_64Mb cofs1=D:\ root=/dev/hda1 eth0=tuntap,"colinux"
其中的hda1换成根文件系统路径,hda2换成Swap的路径。一般可以将以上命令写成批处理。
至此,应该能见到如下界面:
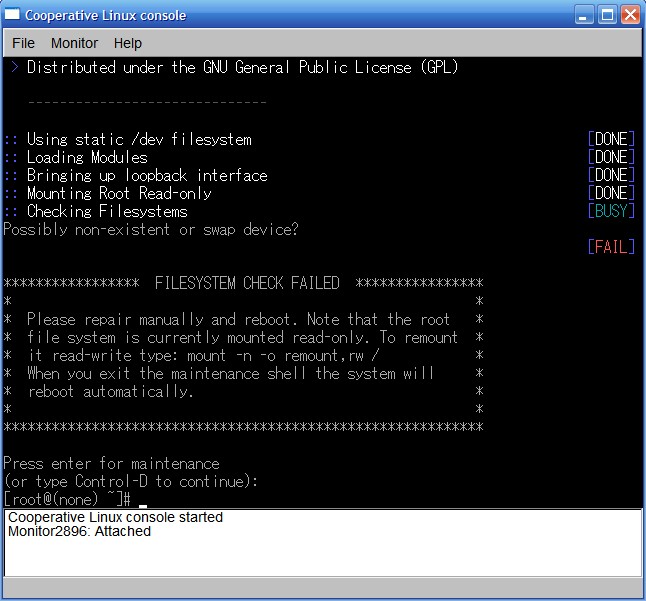
(本篇完)
 评论 (0)